
The Power of Lighting in a Virtual Classroom: Tips on Improving Webcam Lighting for Online Educators
Editor’s Note: Agata Dera, MSW, is an Associate and Live Support Specialist with the Columbia School of Social Work’s (CSSW) Online Campus, where she works with social work faculty and students in online courses to optimize the digital learning environment. In this post, she provides insight on how online educators can put their best foot forward during live sessions through lighting. I first met Agata when I participated in CSSW’s Institute on Pedagogy and Technology for Online Courses last summer. You can read more about my experiences with the Institute in this post. In full disclosure, Agata did review and assess my ability to use lighting in a virtual classroom. All I can say is that I passed.
My primary responsibility is to provide technical support to the Columbia School of Social Work’s (CSSW) online community. My goal is to ensure that technology is considered as a tool rather than a barrier in online education. Also, as an alumni of this program, I am so proud to be a part of a virtual campus that is so committed to the quality of online learning by utilizing technological advancements.
One of the ways in which we ensure that our program is at the highest quality is by educating our community about the importance of great lighting when presenting on a webcam. Good lighting is one of the core elements of a successful on-camera performance for any online educator. It is part of our ongoing effort to create engaging, enlightening and innovative online courses in the most effective way possible.
Over the last 2+ years working with the CSSW online campus, I have provided on-camera performance feedback to hundreds of students, faculty members, and guest speakers. When setting up my home office, I have incorporated the lessons learned from working for the online program to create the right space for me. I am so delighted to get to share with you some of my favorite tips on how to bring your lighting to the next level and instantly improve your on-camera presence.
Please note that this guide is not based on a professional studio type lighting setup. This guide includes my personal experiences with lighting setup, and how I have improved my virtual image as an online educator. I hope that my advice will help both individuals who are just starting their journey of online education and those who have been in the field and wish to improve their webcam skills. I will also include some images throughout this post of my personal home office setup for reference.
Why is lighting important?
One of my responsibilities as an Associate for the Institute on Pedagogy and Technology for Online Courses is providing webcam feedback to our participants during each live session. I use this opportunity to help online educators not only improve how they present on camera but also to teach them how to analyze their own webcam performance. This allows our participants to build a set of tools which they can incorporate in future courses or virtual events.
Over the last two years, I had the pleasure to provide webcam feedback to hundreds of online students and educators which allowed me to gain a deeper understanding about the importance of quality lighting. Although most standard room lighting (such as a ceiling light) is not sufficient for a quality webcam image, I have learned that by adding just a few light sources to our work spaces, we can significantly improve how we present ourselves on camera, and how well we can connect with the person on the other side of the screen.
To illustrate how much of a difference lighting can make, I have prepared several screenshots where my lighting needed a lot of work. In Image 2, it is clear that my lighting is too bright and harsh. A great solution to this problem is using a softbox or a light diffuser. Light diffusers can be purchased online or can be made at home using household items.

In Image 3, although the light pointing at my face is much softer, the background is way too dark particularly on the left side of the image. A great solution to this is to add more lighting sources to the background to create a balance between the foreground and the background.

In Image 4, you can see how much of a difference background lighting can make. As I have very dark walls in my home office, I am able to achieve this look by installing small bookshelf lights as well as placing one desk lamp on the floor to light up the background. I am also using a softbox which gives off a much softer and consistent light in the foreground.
Placement of Light Sources

A key element of a successful on-camera image is a correct placement of the light sources. An incorrect positioning can result in the silhouette effect creating a shadow in the foreground of the screen.
The goal is to create a balance between the foreground and the background. This balance can be obtained by placing the majority of our light sources in front of us rather than behind us. However, it is important to note that some light should illuminate our background as well.
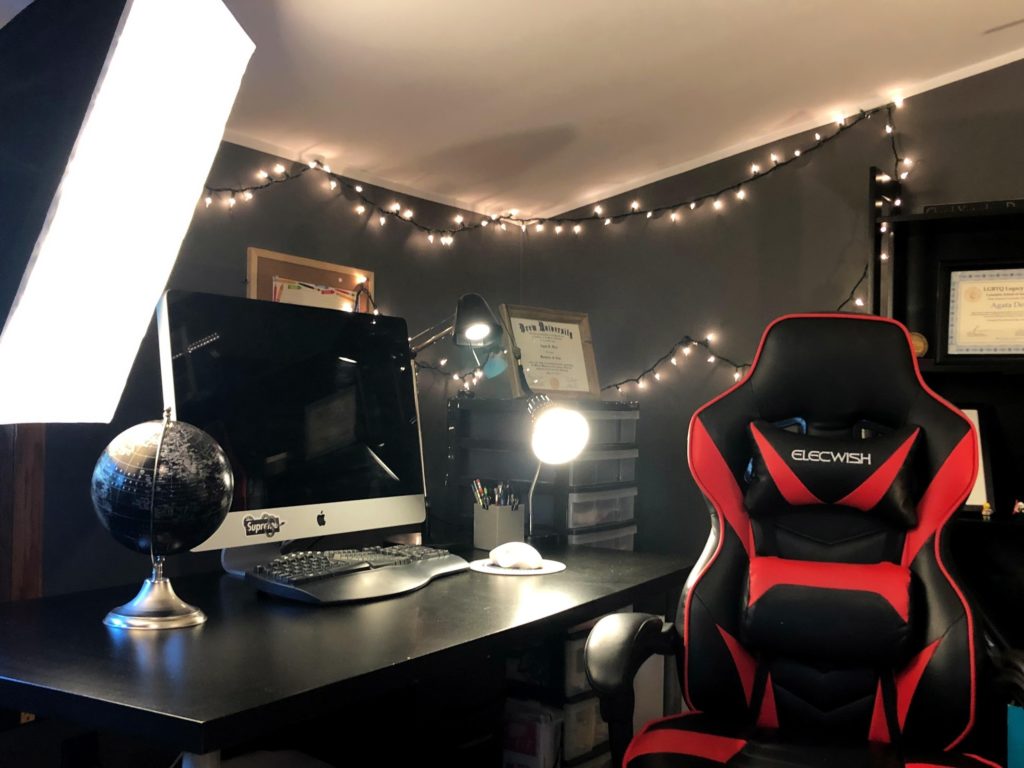
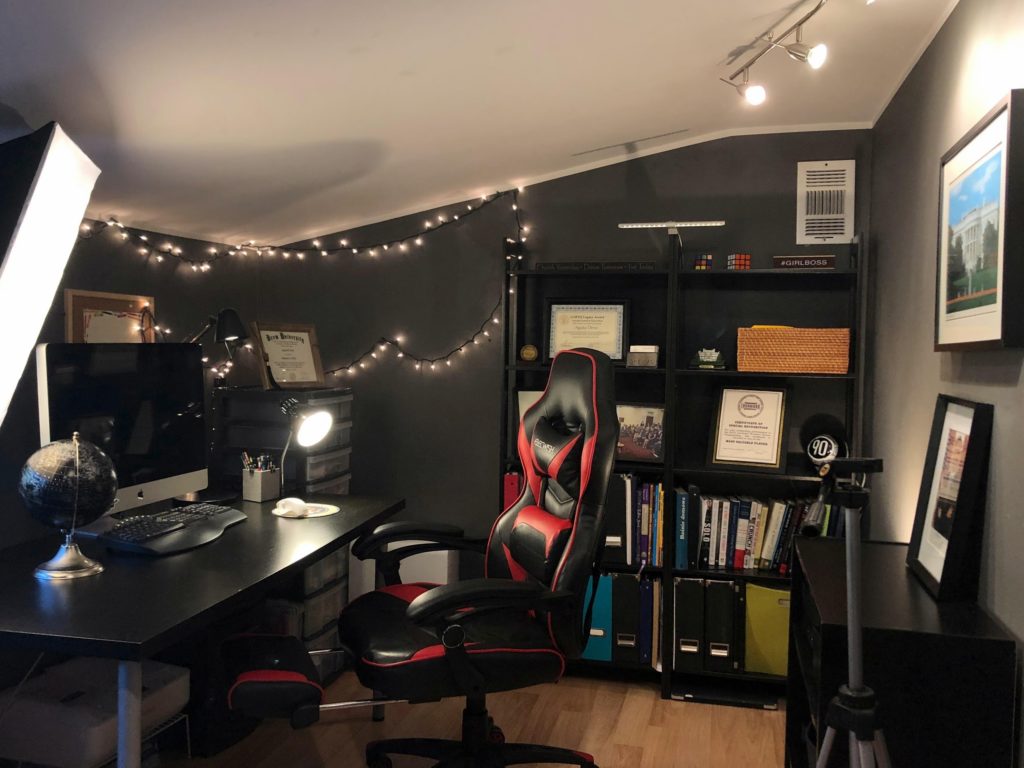
As seen in Image 6, my home office is small, has very dark grey walls (man cave style) and unfortunately has inconsistent natural light. Taking that into account, I setup several sources of artificial light to obtain a desired level of brightness at any time in the day. As you can see in the image of me at my office desk, I placed several light sources behind my webcam and some light to brighten up the framed image in the background. This allows the webcam to focus on the foreground making me as the presenter, the focal point in the image.
However, if all of my lighting was placed behind me, the webcam would automatically choose the background as the brightest point in the image casting a dark shadow over my face. This shadow effect closely resembles someone telling great ghost stories around a bonfire. To be completely transparent with you, I love a little bit of mystery but I think we can all agree that leading an online event is not an ideal place for such lighting effects.
Natural or Artificial Lighting
If natural lighting in an office space is an option for you, I highly recommend taking advantage of it. However, it is important to note that even if you expect to be on webcam during the day, you should always have artificial lighting setup to supplement any inconsistencies. As natural lighting is not fully predictable due to weather, time of the day or even time of the year. You can support the natural lighting by keeping a few lamps in your office is a great plan B.
Number of light sources
The number of light sources depends on the space you are in and how much natural light comes into the room at the time of your webcam presentation. Whenever I provide feedback to students or educators, I always recommend using a minimum of three different light points. The reason for this is that having several lamps allows you to adjust the light to reduce shadows either in the foreground or in the background.
As shown in Images 1 & 6, my home office includes a variety of different types of light sources. The softbox placed behind my computer screen is certainly the main source of light in my work space and I highly recommend this item to anyone interested in improving their webcam lighting. In addition to the softbox, I also use low budget lighting such as:
- Two desk lamps (preferably with LED light bulbs)
- Decorative Christmas lights on my wall
- An LED Picture Lamp
- An LED ceiling track with 5 spotlights for a warm brightening effect
Although this lighting has been tremendously helpful to me for working on webcam, I have recently started working on upgrading my home office lighting. My goal is to have very consistent lighting throughout the day while ensuring that the heat output is at minimum. As a person with neurological disability whose well being is greatly affected by temperature, I constantly seek improvements to my work space to make it as comfortable as possible while presenting well on webcam. As part of this improvement project, I am incorporating these items into my work space:
- 60 LED Continuous Portable Photography Lighting Kit with Color Filters – 2 tabletop lamps. I have purchased this item on Amazon.
- LED Color Changing Rope 32.8ft(10m) which I hope to install around my desk area replacing the current Christmas lights. This item can also be found on Amazon.

Be Comfortable with Your Lighting
The most important thing to remember is that great lighting is meant to supplement our presentation not take away from it. Lamps can create heat especially when they are directed at our face. It is good to note that our lighting setup should not make us uncomfortable or distract us from sharing our message with the audience. As an example, LED type light bulbs can create less heat than other types of light bulbs. As explained by this light bulb color temperature chart, different types of light bulbs use different technologies to create light. The most common type of light bulb (Incandescent light bulbs) uses heat to create light and produces the most heat output. However, it is helpful to keep in mind that for incandescent light bulbs, 60 watts will generate less heat than 100 watts. Therefore, if your lighting creates too much heat, it might be helpful to switch into a different type of light, which would produce less heat output.
For my personal setup, in addition to being mindful about the type of light bulb I use, I also use an additional air conditioning unit in my home office (even during the winter) which helps to reduce any temperature generated by lighting.
Seek Feedback
Regardless if you are new to online education or a seasoned veteran working on your on-camera performance to the next level, asking colleagues/family/friends for feedback can make a tremendous impact. Constructive feedback can be a fantastic tool for improving your image.
Be Creative
When setting up your lighting, allow your creativity to take the lead. Play around with the light sources you have to figure out what works best. I personally re-position my lighting quite often and I quickly test my lighting every time I come on webcam. Great lighting will take time but even with the smallest adjustments, you can greatly improve your webcam skills.
Conclusion
In a virtual classroom, our webcam is imperative for creating a connection with each and every member of our audience. Although technology can often seem quite intimidating to those just starting out, all of us had to learn the basic technology skills at some point in our careers. I hope that my personal experience with lighting inspires you to learn more about lighting and how to utilize light to improve your live,virtual image. I would love to hear more about your work space lighting setup or ways in which you hope to improve your lighting for your online classes or even virtual meetings. Please share your thoughts or questions in the comment section below.
How to cite this post:
Dera, A. (2020, March 16). The Power of Lighting in a Virtual Classroom: Tips on improving webcam lighting for online educators [Blog Post]. Retrieved from Teaching & Learning in Social Work website: https://laureliversonhitchcock.org/2020/03/16/the-power-of-lighting-in-a-virtual-classroom-tips-on-improving-webcam-lighting-for-online-educators/


March 18, 2020
I’m enjoying your blog posts, Dr. Hitchcock.